
Best Upgrades for BMW M2 G87, Dream Car Build I Would Actually Do
Affiliate disclosure. BimmerTalk is a proud partner of the Amazon Associates Program and Turner Motorsport. We may earn a small commission on qualifying purchases through our links, at no extra cost to you. Read the full disclosure.
I do not own a BMW M2 G87. I want to be upfront about that from the first sentence. I daily a stock G20 330i with the B48 turbo four, and I spent a year doing marketing work for BMW and MINI before that. I know the brand well, I know the chassis codes, I know the S58 platform, and I have spent more time under BMWs than most people would consider reasonable. But the G87 sitting in my driveway is still a fantasy. This article is that fantasy written out in full, with real part numbers, real prices, and a real build order that I would actually follow if I woke up tomorrow with an M2 G87 in my garage.
What I have tried to do here is think through the best BMW M2 G87 upgrades the same way I think about my own 330i mods - start with what you feel every day, make sure each upgrade makes sense before adding the next one, and do not blow money on something that needs three other things to reach its potential. A lot of M2 G87 upgrade guides throw everything at the wall and let you sort it out. I am not doing that. I am picking seven specific parts, telling you exactly why I picked each one, telling you where it fits in the order, and giving you the price up front.
Here is the full list, in the build order I would actually follow:
- Eventuri V2 Carbon Intake (the S58 breathes better immediately)
- Dinan Adjustable Coilovers (the G87 chassis deserves better than stock at spirited driving pace)
- Pagid Racing RSL29 pads (for the track days I would absolutely book the moment I owned this car)
- Neuspeed RSf72 forged wheels (unsprung weight reduction plus the right look)
- Turner Carbon Front Lip (sharpens the nose without going full race car)
- Turner Rear Diffuser (completes the rear end properly)
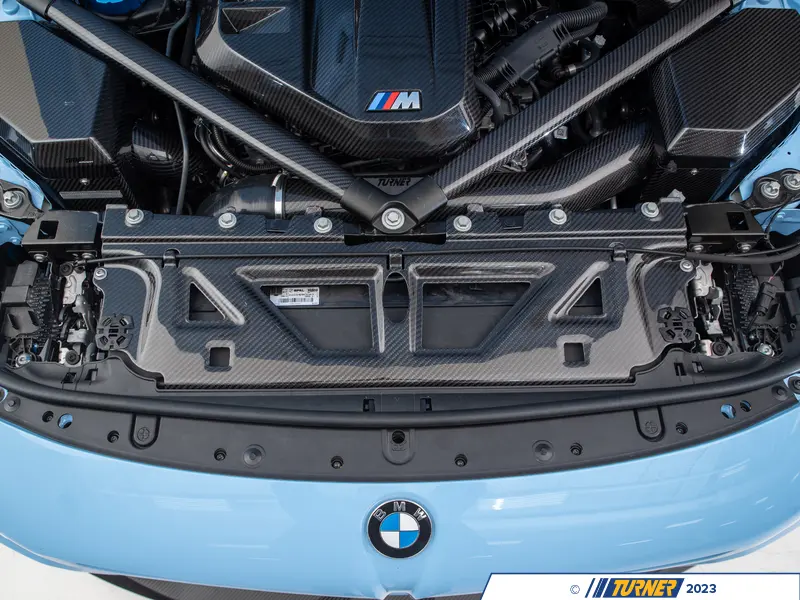
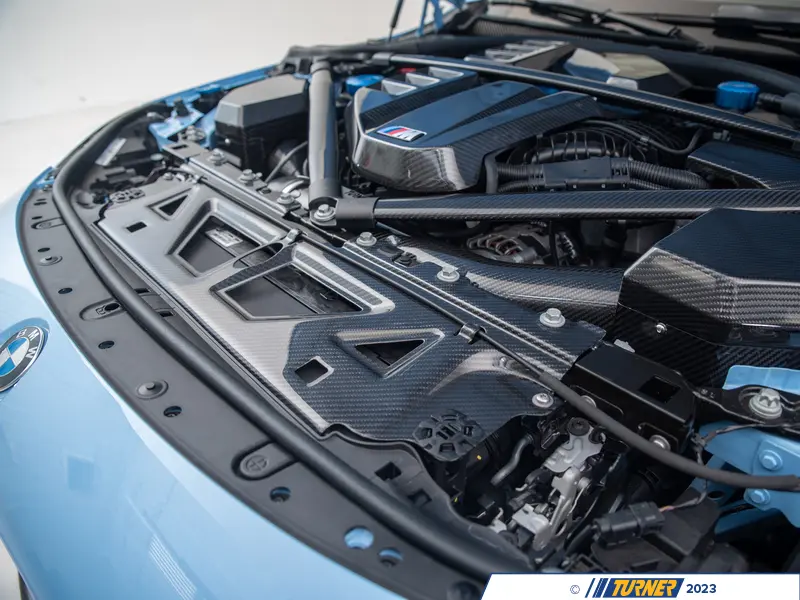
- Turner Carbon Radiator Cover (because the S58 bay deserves a finish that matches the Eventuri intake sitting right next to it)
Seven upgrades. One build sequence. Total cost lands in the ballpark of $9,500 before labor, and I will break that down honestly at the end.
Best Upgrade Parts for BMW M2 G87
| Type | Part | Price | Buy Now |
|---|---|---|---|
| Intake | Eventuri V2 Gloss Carbon Intake for BMW G8X S58 | $2995.00 | Turner Motorsport |
| Suspension | Dinan G87 - Adjustable Coilover Suspension for M2 | $1126.95 | Turner Motorsport |
| Brake Pads | Pagid Racing 1204 RSL29 - Brake Pads for StopTech ST40 | $471.99 | Turner Motorsport |
| Wheels | Neuspeed RSf72 - 20x9 Wheel Set for BMW Square Fitment | $3356.00 | Turner Motorsport |
| Front Aero | Turner Motorsport G87 - Carbon Front Lip for M2 | $799.99 | Turner Motorsport |
| Rear Aero | Turner Motorsport G87 - Rear Diffuser for BMW M2 | $289.00 | Turner Motorsport |
| Engine Bay | Turner Motorsport Carbon Radiator Cover - Engine Bay Trim for G8X | $520.52 | Turner Motorsport |
S58 breathes better, sharper response
Turner MotorsportLower ride height, keep EDC dampers
Turner MotorsportTrack-day brake confidence, no fade
Turner MotorsportForged 20x9 square, less unsprung weight
Turner MotorsportSharper nose with mild downforce
Turner MotorsportCleaner rear end, OEM-style fit
Turner MotorsportCarbon finish to match the intake
Turner MotorsportThis is also a 100% Turner Motorsport build. Every single product on this list is sourced through Turner, and that is not accidental. Turner is the US-based BMW specialist I trust most for a build like this, and I will explain that reasoning in its own section. The short version is that when you are spending this kind of money on a car this good, you want one shop that knows BMWs cold instead of five different storefronts with five different return policies and five different ideas about what fits your chassis.
If you are here because you already own a G87 and you are researching M2 G87 mods, then you are in the right place. If you are trying to understand the full landscape of BMW M2 G87 tuning before you commit to anything, you are also in the right place. And if you are like me - a BMW person who has not pulled the trigger on a G87 yet but who has already started a mental spreadsheet of what an M2 G87 build would look like - then this article was written specifically for you.
Why the BMW M2 G87 is THE dream BMW right now
The G87 M2 launched for the 2023 model year and landed with the S58 3.0-liter twin-turbo inline-six making 453 horsepower and 406 lb-ft of torque. That is the same engine family that powers the G80 M3 and G82 M4, which matters enormously for the aftermarket because it means the platform has been stress-tested extensively by both tuners and racers before the M2 even hit showrooms. The S58 in the G87 is not a brand-new unknown - it is a mature performance engine with a well-mapped upgrade path from day one. That is rare for a car in only its second or third model year.
What makes the G87 feel different from the G80 M3 in day-to-day driving is that the M2 is RWD only, smaller, and lighter. The G80 M3 can be had in xDrive, which is a brilliant all-weather tool but dilutes the purist feel. The G87 does not offer that option. You get rear-wheel drive, a manual gearbox that BMW actually put effort into, and a chassis that was tuned for this exact configuration instead of being adapted from a wider family sedan. The result is a car that feels more focused even before you touch a single mod.
The comparison I keep coming back to is this: if someone offered me a G80 M3 or a G87 M2 at the same price, I would take the M2 every single time. The M3 is a more practical car. The rear seats actually fit adults, the trunk is bigger, the xDrive option is there if you need it. But I do not want practical from a car like this. I want the smaller footprint, the snappier steering response, and the knowledge that every single component in that car was put there for one reason: driving feel. The G87 gives me that without compromise, and that is why it tops my personal dream car list above both the G80 M3 and the G82 M4 right now.
From an M2 G87 tuning perspective, the situation is almost ideal. The S58 has proven itself to be a strong platform for power gains - tuners have pushed it well past 600 horsepower on stock internals with supporting mods, though that is not where my G87 build is headed. More relevant for a street-focused build is that the intake, suspension, and aero aftermarket for this platform was already mature when the G87 launched, because so much of it carries over from or was influenced by the G80 and G82 programs. The F87 M2 Competition that preceded the G87 built a huge community of engaged owners, and many of those owners have already mapped out exactly which upgrade paths work and which ones do not. That accumulated knowledge makes G87 M2 upgrades a more confident purchase than they would be on a brand-new platform with no track record.
The one thing I would add about the G87 that rarely gets enough credit is what BMW did with the exterior. I will say it plainly: the G87 is a better-looking car than the G82 M4. The wide-body fenders work on the M2 in a way that the oversized kidney grilles do not work on the M4. It is a more coherent design. It looks like a car that earns its bodywork rather than wearing it for show. That matters to me when I am thinking about an aero build, because it means the starting canvas is already strong and the mods I add need to complement a good design rather than fix an awkward one.
How I would order BMW M2 G87 upgrades
The order I follow for any BMW performance build starts with the powertrain, moves to chassis, then adds brakes, then wheels, and finishes with aero. The logic is simple: power mods that you feel on every drive justify their cost the fastest. You do not need to be at a track or pushing the car hard to notice a better intake - every highway merge, every on-ramp pull, every time you drop two gears on a back road, you are getting a return on that investment. Suspension work comes second because the G87's stock spring rates are a compromise tuned for a broad range of owners, and dialing that in makes the car feel more like what it should be. Brakes come third because if I am taking this car to a track - and I absolutely would - I need pads that can survive a full day without fade before I go hunting for extra performance anywhere else.
Wheels come fourth, which might surprise some people who think of them as purely aesthetic. The reason wheels sit ahead of aero in my order is unsprung weight reduction. Every gram you remove from the rotating assembly has a disproportionate effect on how the suspension reacts, how steering feels, and how quickly the car changes direction. A set of quality forged wheels is a real performance upgrade, not just a visual one. That makes them a higher priority than the front lip and rear diffuser, which are primarily visual at street speeds with a genuine functional benefit that only becomes significant at sustained high speed.
The aero pieces - the Turner front lip and rear diffuser - come last in my build sequence because they are the finishing layer on top of an already upgraded car. They make the G87 look sharper and more intentional, and the front lip does have real downforce benefits at speed, but they do not make a bad setup good the way the intake or suspension can. If I had to cut two items from this list due to budget, these would be the first two to go. They are the most replaceable pieces on the list, and they are also the most vulnerable to parking lot damage, which is another reason I would rather have the mechanical stuff sorted first.
One thing I want to address directly because I get asked about it constantly. I would not start with a tune. I know that sounds counterintuitive for a build article about an S58-powered car, but here is my thinking. A tune before supporting mods is putting the cart before the horse. The ECU is going to be retuned anyway once the intake is on and any future exhaust work is done. Doing a tune on the stock intake, then paying to retune again after the Eventuri goes in, is a waste of money. More importantly, if you are still under warranty or within CPO coverage, a tune is the single fastest way to complicate a warranty claim. The hardware mods I have listed here are detectable but they are not the same category of warranty risk as a full flash tune. I will cover the warranty question in detail in the FAQ section below.
The Turner Carbon Radiator Cover sits at position seven in this list, and honestly it could sit anywhere from five to seven without the build suffering. It is an engine bay cosmetic piece, full stop. I put it last because it makes the most visual sense once the Eventuri intake is already installed - the carbon cover and the carbon intake together make the S58 bay look genuinely intentional rather than like a collection of individual upgrades. If you install the cover before the intake, you are finishing the room before the furniture arrives.
Why I am building this entire list around Turner Motorsport
Turner Motorsport is based in Amesbury, Massachusetts, and they have been working on BMWs since 1993. That is not a throwaway credential - 1993 means they were tuning E36 M3s and E34 M5s when most of the current BMW aftermarket did not exist. They have run a competitive BMW racing program alongside their retail business for most of that history, which means the parts they stock and develop are not selected by a merchandising team guessing at what sells. They are selected by people who have actually raced this platform, broken these parts, and had to fix them at the side of a track. That background shapes everything about how Turner curates their catalog.
For a build like this, the single-source argument is real. I carry brands like Eventuri, Dinan, Neuspeed, and Pagid Racing alongside their own house-designed parts, which means a G87 owner can put together a complete build without opening multiple accounts or dealing with multiple shipping timelines. That matters more than it sounds when you are coordinating an install. If the intake arrives from one supplier, the coilovers from another, the wheels from a third, and two of the three are delayed, you are paying a shop to wait. Using one specialist who stocks everything you need from the same location is worth something real in scheduling time and install efficiency.
The other thing Turner brings that a generic parts marketplace does not is application-specific knowledge. When I look at a Dinan coilover listing on Turner, the product description reflects actual development work on the G87 chassis specifically - the spring rate change at the rear, the bump stop revision, the specific drop recommendations. That is not boilerplate copied from another platform fitment. It is the kind of detail that only comes from actually working on the car. For an owner building a G87 and using their car seriously, that is the difference between a part that installs cleanly and performs as expected versus one that fits in the catalog but fights you on the car.
For everything in this build, including research and sourcing, Turner Motorsport is who I would call first. That is my genuine position on it, not a formality.
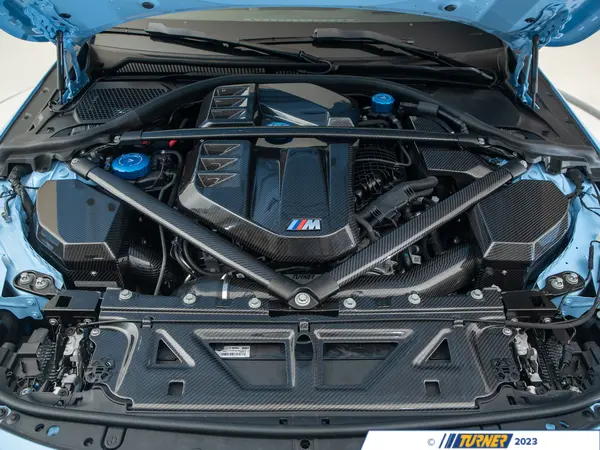
Upgrade 1 - Eventuri V2 Gloss Carbon Intake for the BMW M2 G87 S58
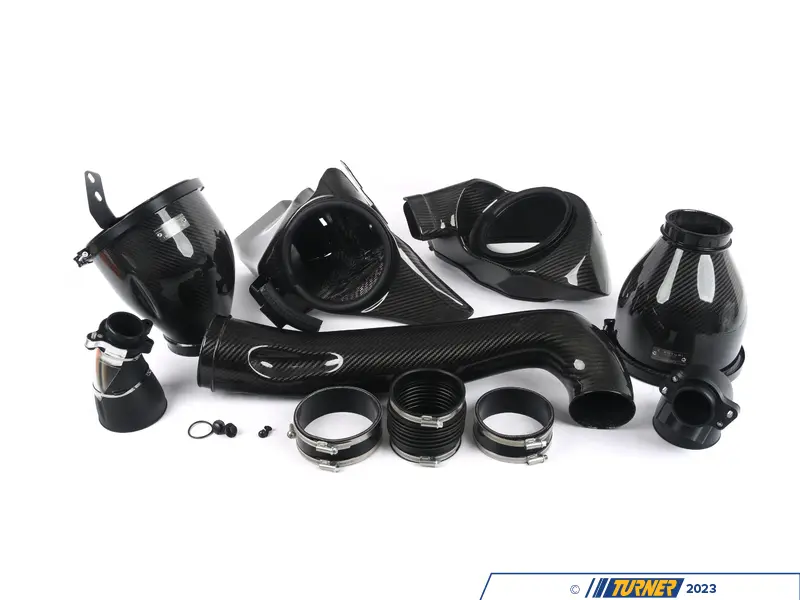
$2995.00
Eventuri V2 gloss carbon intake system installed in the S58 engine bay of a G87 BMW M2
If I only did one hardware upgrade to a G87 M2, this is the one I would do first and I would not hesitate about it. The Eventuri V2 Carbon Intake for the S58 is the most immediately noticeable modification on this entire list. Every time you get on the throttle, from a light pull to a full-noise highway run, the intake character of the car changes. The S58 is already an impressive engine from the factory, but BMW's OEM airbox is designed around noise regulations, heat management for the emissions equipment, and crash safety geometry. It is not designed for maximum airflow. The Eventuri system removes that restriction and replaces it with something that was built from the ground up for performance airflow.
What I find interesting about the Eventuri V2 over simpler cone filter upgrades is the sealed housing design. The whole premise of an open-element intake is that you pull more air - but if that air is sitting at 180-200 degrees Fahrenheit in your engine bay after a run, you are feeding the turbos hot air with lower oxygen density. The Eventuri sealed carbon housings, combined with the duct and front scoop layout, are designed to draw from ambient air while keeping the intake charge more isolated from engine bay heat. That is the kind of engineering detail that actually matters for a car you drive hard repeatedly, not just in one cold morning pull that gets posted online.
I have followed the reception of this kit across G80 M3 and G82 M4 owners since it launched, and the consistent feedback is that the sound improvement is significant without becoming obnoxious. BMW tuned the stock intake to be relatively quiet for road-car refinement reasons. The Eventuri changes that character - you hear the turbos loading, you hear the induction note on hard pulls, but it does not turn your S58 into a car that sounds like it has an aftermarket intake installed by someone who wants maximum attention at every stop light. The balance is right, which matters to me because I plan to daily this hypothetical G87, not just drive it to cars and coffee.
Eventuri V2 carbon intake for the G87 S58 explained
The Eventuri V2 Gloss Carbon Intake is a complete replacement intake system for S58-powered G8X chassis cars - that is the G80 M3, G82 M4, G83 M4 Convertible, and G87 M2. The kit includes two sealed carbon filter housings, two Gen 2 high-flow air filters, enlarged dimpled turbo inlets on both sides, left and right carbon intake tubes with integrated MAF sensor mounts, silicone couplers, brackets, and BMW-spec hose clamps. It is a comprehensive kit, not a filter swap. You are replacing essentially the entire intake path from the air entry point to the turbo inlet.
The construction matters here. Eventuri uses real carbon fiber for the housings and tubes - not carbon-wrapped plastic, not ABS with a carbon print. The sealed housing design is the key engineering differentiator from a simple cone filter setup, and the dimpled turbo inlets are designed to maintain smooth airflow characteristics through the connection to the turbo. The MAF sensor integration is worth calling out specifically because on a turbocharged BMW, a poorly executed MAF mount can introduce measurement inconsistencies that affect fueling. Eventuri builds the mount directly into the carbon tube, which eliminates that variable. From a fitment standpoint, this is a direct replacement that uses existing mounting points, though installation requires the kind of comfort working around the S58's engine bay that most experienced DIYers will be fine with. If you have not worked around turbocharged I6 BMW motors before, plan for an afternoon rather than an hour.
One hard limitation: this kit is not CARB-legal, which means it is not legal for road use in California on pollution-controlled vehicles. If you are in California and your car is subject to smog testing, factor that in before ordering. For the rest of the country, there is no road legality issue.
Where the Eventuri intake fits in the M2 G87 build order
The intake goes in first, full stop. It is the mod that pays dividends on every single drive from the moment it is installed. If a tune is coming down the road - and on an S58 build it probably should be, eventually - the intake needs to be on the car before the ECU is calibrated so the tune reflects the actual airflow numbers the engine will live with. Installing the Eventuri now and planning to tune later is exactly the right sequence. You get immediate gains, and you are not paying to have the tune revised when you change the intake setup six months down the road. If you are using our BMW intake catalog to compare alternatives, the Eventuri V2 sits at the top of what I would consider for an S58 build, and the price reflects that positioning.
Who should skip this for now? Honestly, if you are in the first year of ownership and you have a valid CPO warranty you really do not want to complicate, I understand waiting. An intake is one of the more visible hardware mods in the engine bay and if something goes wrong with the turbo system during the warranty period, the presence of an aftermarket intake will come up in the conversation with the dealer. It does not automatically void anything, but it gives the dealer ammunition. I will address this more directly in the FAQ section. For owners outside warranty, or owners who are comfortable navigating that conversation, there is no reason to wait.
Upgrade 2 - Dinan Adjustable Coilovers - dialing in the G87 chassis
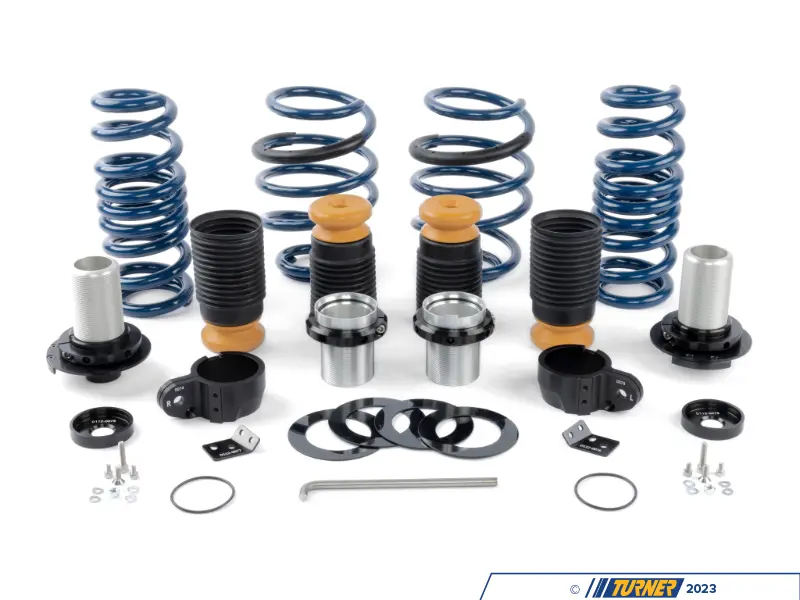
$1126.95
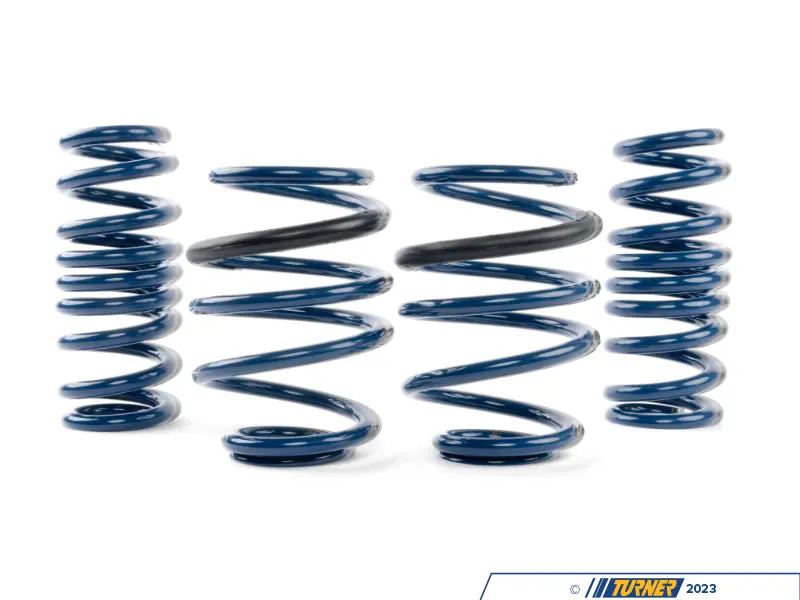
Dinan adjustable coilover suspension system for BMW G87 M2 showing threaded collar and spring assembly
The G87 M2's stock suspension is not bad. I want to be clear about that because I am not going to pretend the factory engineers shipped a broken chassis. The stock setup is competent, it handles well for a road car, and BMW's M adaptive dampers do a lot of work in the background to make the car feel sorted across different road conditions. But competent is not the same as dialed in. The stock spring rates represent a broad-spectrum compromise that works for a 25-year-old driving to work, a 45-year-old taking canyon roads on the weekend, and a 30-year-old who wants to explore a track day twice a year. None of those drivers get exactly what they need from the factory setup, because the factory setup is trying to serve all three at once.
What I would want from a G87 suspension upgrade is adjustable ride height, a better spring rate balance for spirited street driving, and the ability to keep the electronic dampers that BMW spent serious engineering resources developing. The Dinan adjustable coilover system for the G87 does all three of those things, and the third point is the one that matters most to me. Removing the adaptive dampers from the equation might make sense for a dedicated track car, but for a street-driven G87 that I am also taking to track days, keeping the electronics is a significant quality-of-life advantage. The difference between Comfort and Sport Plus mode on the M2's adaptive suspension is real and usable, and I do not want to give that up.
The other thing Dinan did that I respect is the rear spring rate recalibration. The G87 M2 already has a rear-biased handling character - it is a RWD car with a big engine and it is set up to rotate. Adding rear spring stiffness carelessly on a chassis like this can push the balance further toward snap oversteer than most street drivers want. Dinan went in the other direction at the rear - they softened the rear spring rate relative to stock and switched from the factory progressive rear spring to a dual-rate design. That means the rear end of the car has better progressive compliance for street bumps while still maintaining the body control you need when you are using the car hard. That kind of chassis-specific thinking is why I would choose this over generic lowering springs.
Dinan G87 coilovers and how they keep the EDC dampers
The Dinan Adjustable Coilover Suspension is built specifically for the G87 M2 chassis - this is not a G80 M3 kit with a different application note appended. The system uses threaded collars on the existing shock body to allow ride height adjustment, paired with revised spring rates and progressive bump stops. The factory electronic dampers stay in place, so you are changing the spring side of the equation without touching the damping side. That is the right approach for a street car with adaptive dampers, because the electronics can still do their job once the spring rates and ride height are set where you want them.
The adjustment range is meaningful: up to 1-1/8 inch of drop at the front and over 2 inches possible at the rear, though Dinan recommends starting at the 3/4-inch drop front and rear for the best balance of ride quality and visual stance. I would start there and live with it through different road conditions before deciding if I wanted to go lower. Lowering a car further than necessary creates fitment issues with tires, increases the chance of bottoming on speed bumps and driveways, and does not necessarily improve handling - at some point you are going the wrong direction on wheel travel and geometry. The 3/4-inch recommendation from Dinan is based on actual chassis testing, and I would take it seriously.
One practical note on install: this is a suspension job that requires corner weighting and a four-wheel alignment once the ride height is set. Plan that into your install budget from the start. Skipping the alignment after adjusting ride height means you are driving a car with compromised geometry, which defeats the entire point of spending money on a better suspension setup. If you want to understand all the alignment considerations specific to this kind of work, our BMW coilovers buyer's guide goes deep on this topic, and our BMW coilover catalog has the full range of options if you want to compare alternatives before deciding.
Where Dinan coilovers fit in the M2 G87 suspension upgrade
The Dinan coilovers go in second, after the intake and before the brakes. The reasoning is simple: once you start taking a car to track days, the setup you want on street is not identical to what you want on track, and having the suspension adjustment dialed in before you start working out brake setups means you have a stable baseline to evaluate brake performance from. If your car is bouncing around on stiff springs when you are testing new pads, you are not getting an accurate read on what the pads are doing. Get the suspension sorted, let yourself live with the car for a few weeks, then move to the brakes with a settled chassis.
If you are a driver who almost never pushes the car, or someone who runs the stock M adaptive suspension in Comfort mode exclusively for highway comfort reasons, the stock suspension is honestly fine and there are better places to put $1,100 in this build. But for anyone who wants to use this car the way it was designed to be used - back roads, occasional track days, driving it like a driver rather than a commuter - the Dinan system is money well spent.
Upgrade 3 - Pagid Racing RSL29 Brake Pads - because track days are the whole point
$471.99
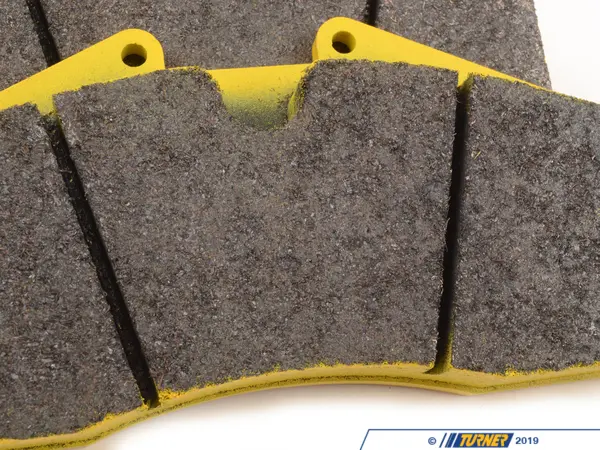
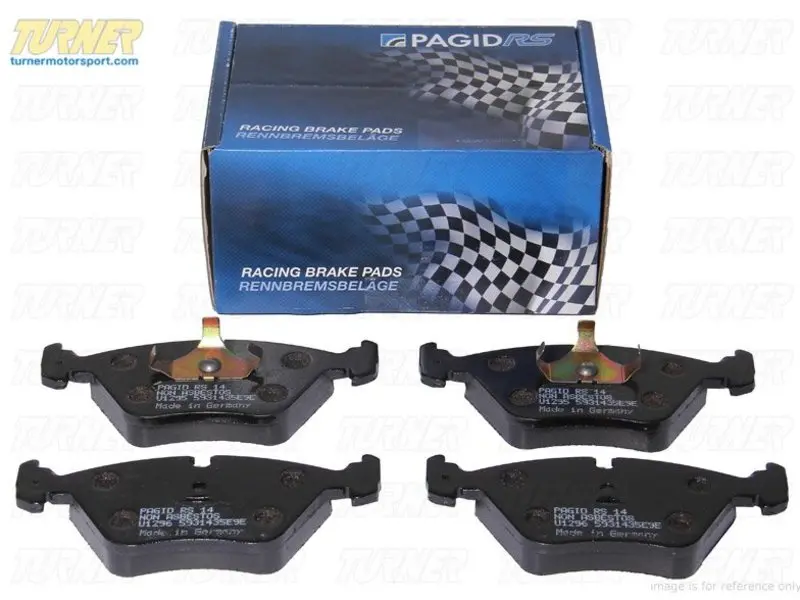
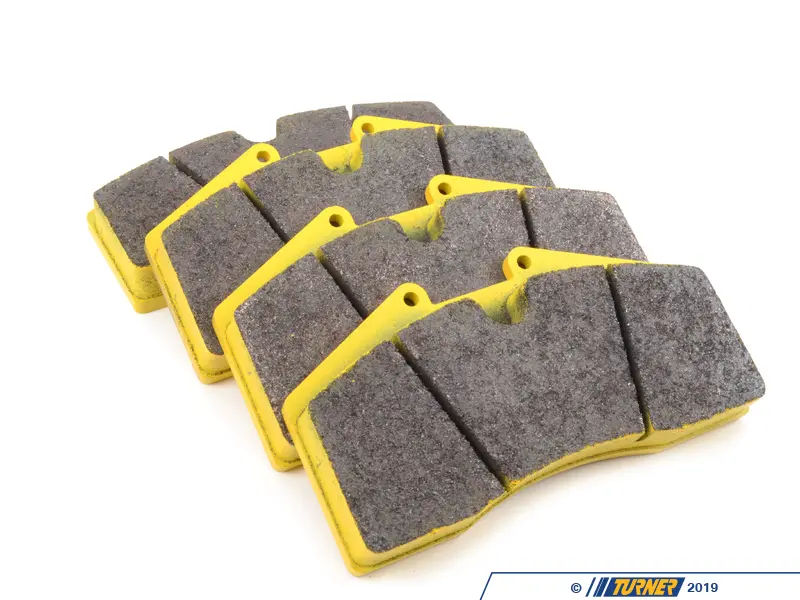
Pagid Racing RSL29 Yellow compound brake pads for StopTech ST40 calipers shown as a set of four
The moment I owned a G87 M2, I would book a track day. That is not a hypothetical. I know myself well enough to know that owning the car and not using it at a circuit would drive me insane. And the moment you put an M2 G87 on track with stock brake pads and start doing repeated hard stops from triple-digit speeds, you are going to feel the stock pads fade. The factory pads on the M2 are fine for road driving, including enthusiastic road driving. But they are calibrated for low noise, low dust, and adequate cold-bite - not for the kind of thermal cycling a track session puts them through. After the second or third hot lap, you will be braking earlier, pressing harder, and wondering if you need to slow down more. That is pad fade, and the only solution is better pads.
I would pair the Pagid RSL29 pads with a StopTech big brake kit. The Pagid 1204 RSL29 is listed specifically for StopTech ST40 and ST45 four-piston calipers, which is the most popular big brake kit configuration for this platform. The reason I am recommending a big brake kit as the foundation rather than just swapping pads into the stock calipers is that the stock M2 brakes, while larger than standard BMW fare, are still calibrated for stock power levels on a car used primarily on road. When you have an Eventuri-equipped S58 making improved power, and you are eventually going to use this car at a track with real braking zones, the stock setup becomes the limiting factor faster than you would expect. A StopTech ST40 kit gives you calipers designed for sustained thermal load, and the Pagid RSL29 is the pad compound that makes the most sense on that caliper for the way I would use this car.
The reason I chose RSL29 over a more aggressive compound is the wear-to-performance balance. A sprint-focused compound might give you slightly more initial bite in the first few stops of a session, but it wears faster and can behave less predictably across the full temperature range you see on a mixed street-and-track car. RSL29 is an endurance compound that still has more bite than RS19, which means it works well from the first lap to the last without the kind of taper in feel that harder sprint compounds can show. For someone who is going to drive to the track, use the car all day, and drive home, the endurance-focused compound character is the right choice.
Pagid RSL29 yellow compound and StopTech ST40 fitment
Pagid Racing is a German brake pad manufacturer with a long motorsport history, and the RSL29 - also sold as Yellow RS 29 - is one of their most proven endurance compounds. This listing is for pad shape 1204, which is the specific geometry for StopTech ST40 and ST45 four-piston calipers. The pad shape number is what actually matters here, not just the BMW chassis code in the title. The 1204 shape fits StopTech ST40 applications across a wide range of BMW platforms including E36, E46, E39, E60, E63, E64, E31, E38, and E53 setups, as well as the G-series applications. If you do not have a StopTech ST40 or ST45 caliper, this specific listing does not fit your car. Confirm your caliper model before ordering.
The RSL29 compound runs in a usable temperature window that starts at a meaningful operating temperature rather than stone cold, which means it needs a warm-up lap or two before it is at its best. On track, that is fine and expected. On street, you are unlikely to reach the full operating window in most driving scenarios, which is actually a feature rather than a limitation - it means the compound is not aggressive or grabby during casual street driving. The friction level is higher than RS19, which makes it better for longer stints and heavier braking loads, and the wear rate is excellent for a performance compound. Pagid's manufacturing consistency is also worth mentioning - these are competition-grade pads built to tight tolerances, not performance-labeled street pads with loose compound consistency between sets.
On the install side, the fitment is straightforward if you have experience doing a big brake pad swap. Clean the caliper piston faces before installing new pads, use the correct brake lubricant on the pad backing plates and shim contact points, and bed the pads properly according to Pagid's bedding procedure before any hard use. Skipping the bedding procedure with a fresh set of race pads is one of the more common track day mistakes I see, and it degrades both the pads and the rotor surface faster than normal use would. Check our BMW brake pad catalog if you want to compare compounds before deciding.
When Pagid RSL29 pads make sense in an M2 G87 track build
Brakes come in at position three for one specific reason. I need to know I can stop the car before I start pushing it harder. With the Eventuri intake on and the Dinan suspension sorted, the G87 is meaningfully quicker and more capable than stock. That extra capability raises the stakes of every driving scenario, and the stock brake pads are not keeping pace with the upgraded powertrain and suspension. Sorting the brakes at this stage means that when I book that first track day, I am going with a car that is upgraded across all three fundamental performance systems - power, chassis, and braking - rather than having a fast car that can only stop as well as stock.
Who can skip this for now? Anyone who is not planning to track the car in the near term and who drives street-only. The stock brake pads are genuinely fine for road use. The RSL29 is a track-focused compound, and it really shows its value in repeated heavy braking scenarios. If track days are not on your agenda in the first year of ownership, keep this as a future upgrade and allocate that budget to wheels instead.
Upgrade 4 - Neuspeed RSf72 Forged Wheels - removing unsprung weight and getting the look right
$3356.00
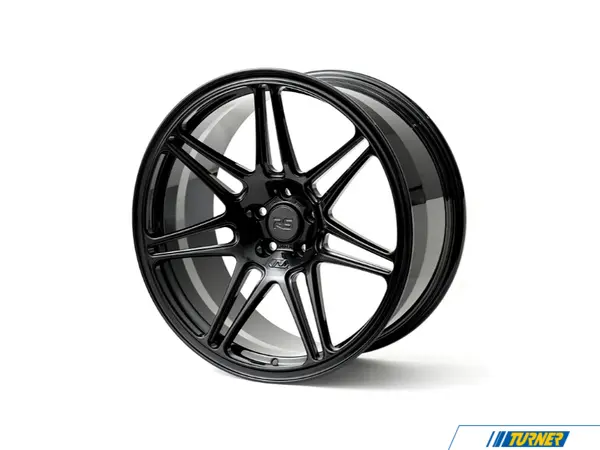
Neuspeed RSf72 20x9 forged monoblock wheels in gloss black showing split seven-spoke design for BMW G87 M2
Wheels are one of those upgrades where you get two genuinely separate benefits that happen to come in the same package. The visual improvement is obvious and immediate - the right wheel set transforms how a car looks at the curb in a way that almost nothing else can match at the price. But the performance benefit from forged wheels is just as real, and it is one that many people underestimate until they feel it. The G87's stock wheels are not heavy by cast wheel standards, but they are not forged either. Going to a quality forged monoblock wheel like the Neuspeed RSf72 drops rotational and unsprung mass, and the effect on steering feel, suspension reactivity, and the general crispness of the car's responses is noticeable to anyone paying attention.
I chose the Neuspeed RSf72 in 20x9 square fitment for several specific reasons. The square setup - same size front and rear - means I can rotate my tires, which extends tire life significantly and is a real-world cost saving on a car that will eventually be running performance tires that cost $300-400 each. The 20-inch diameter works with the G87's brake setup including upgraded brake kits, and the ET35 offset suits the G87 chassis geometry cleanly without needing spacers or custom alignment adjustments. The split seven-spoke design also has a secondary function beyond looks - the open spoke pattern promotes airflow to the brakes, which matters for a car that is going to see track use with hot brake assemblies.
The gloss black finish is the one I would pick for a G87 because the car's body lines already have enough visual complexity. A gloss black wheel reads as purposeful and clean against the M2's body without competing with the bodywork. I have seen the G87 on various wheel finishes and my honest opinion is that dark wheels suit this car better than polished or chrome options. The BMW M Performance design language leans into black and carbon as accent themes, and the RSf72 in gloss black fits that aesthetic without looking like it was bolted on from a different car's mood board.
Neuspeed RSf72 forged 20x9 spec sheet for BMW square fitment
The Neuspeed RSf72 is a monoblock forged wheel, meaning it is machined from a single forged billet of aerospace-grade aluminum rather than being cast or flow-formed. Monoblock forged construction is the strongest and lightest approach for a one-piece wheel design, which is why it is the construction method of choice for serious track wheels. The 20x9 sizing with ET35 offset and 66.5mm center bore is a specific fitment combination that works across a wide spread of newer BMW chassis including the G20 (my own car, for reference), G42 230i, G80 M3, G82 M4, G83 M4 Convertible, and G87 M2.
The kit includes Neuspeed ball seat bolts for BMW fitment, which is important because modern BMW lug bolts use a specific ball seat interface rather than the conical seat common on other European cars. Having the correct hardware in the box eliminates a common fitment error where owners use incorrect bolts and end up with improperly seated wheels. The 5x112 bolt pattern is standard across modern BMW platforms, so there is no adapter needed. The 66.5mm center bore is a direct fit for the G87 and most modern BMW hub diameters, but if you are fitting these to an older chassis where the hub is smaller, you would need hub-centric rings - not an issue on the G87. Visit our BMW aftermarket wheel catalog if you want to compare alternative forged options before deciding on the RSf72.
From an install standpoint, this is a straightforward wheel swap. The only things to confirm are that your tire shop uses a torque wrench to final-torque the lug bolts to spec (110 Nm for BMW) rather than using an impact gun to final torque, and that they check the center bore fit before mounting tires. Re-torqueing the wheels after 50-100 miles is a standard recommendation for any new wheel installation. One thing worth noting is that a 20x9 square fitment on the G87 works with either 245 or 255 front tires and 255 or 265 rear tires depending on your preference for front-rear balance. If you go wider at the rear, you lose the ability to rotate front-to-rear, which defeats part of the square setup logic.
Where the Neuspeed RSf72 wheels land in the M2 G87 mod order
The wheels go on at stage four, after the intake, suspension, and brakes are sorted. My reasoning is that the suspension alignment needs to be final before you commit to wheel and tire sizing, and the brake upgrade should be on the car so you know your exact caliper and rotor clearance requirements before you order wheels. Some big brake kits have specific minimum wheel diameter requirements - 18 or 19 inches is common for large calipers - and ordering the wrong wheel size for your brake kit is an expensive mistake to fix. With the StopTech ST40 big brake kit already in place, the 20-inch RSf72 clears comfortably. If you are keeping the stock brakes, the 20-inch fitment still works fine, but it is worth confirming clearance regardless.
The one group of G87 owners who might skip the wheel upgrade is someone who tracks the car seriously and wants to keep a dedicated track wheel set separate from their street setup. In that case, keeping the stock wheels for track use and running the Neuspeed RSf72 as street wheels makes good sense - you can track your stock wheels hard without worrying about corner damage to your nice forged set. For everyone running a single wheel setup, the RSf72 is durable enough for both uses.
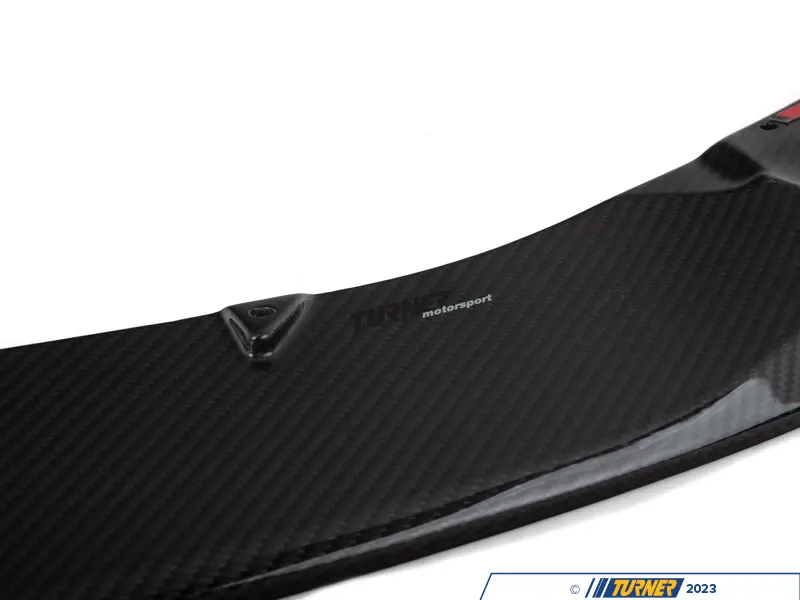
Upgrade 5 - Turner Motorsport G87 Carbon Front Lip - sharpening the nose
$799.99
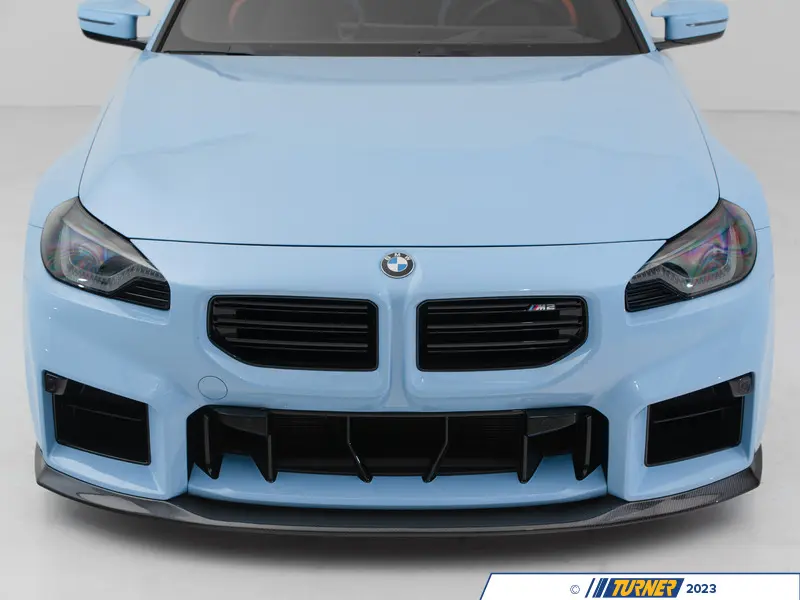
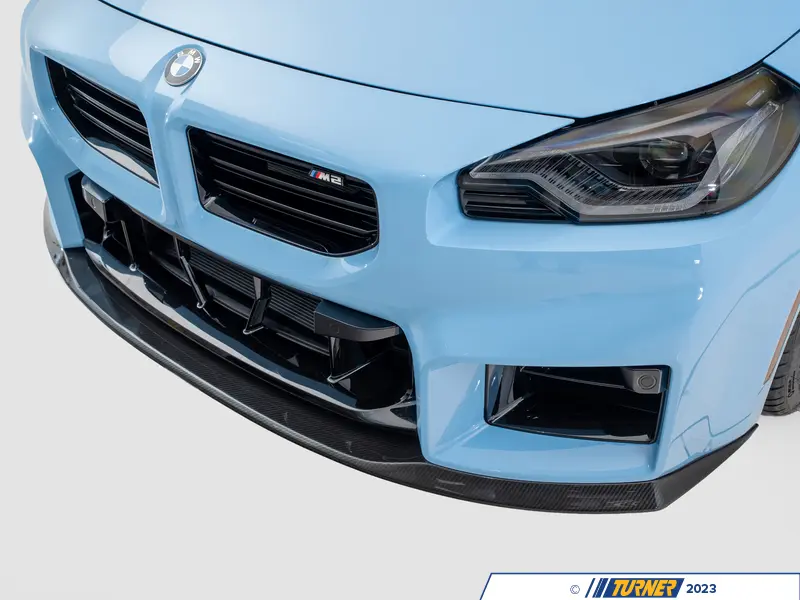
Turner Motorsport carbon fiber front lip installed on BMW G87 M2 showing 2x2 twill weave finish and aggressive front profile
This is where the build shifts from performance-focused to aesthetics-with-a-function, and I am completely comfortable with that. The G87 M2's stock front bumper is well-proportioned and aggressive-looking for a road car. But it reads as stock to anyone who knows the platform, and there is a cleaner, sharper version of that nose available if you want it. The Turner Carbon Front Lip is the version of this upgrade I would buy, and the reason is fitment. Turner designed this lip in-house around the actual G87 bumper geometry, not as a universal part that requires trimming or adaptation to sit flush. When I install a carbon piece on a car this good, I want it to look like it grew there, not like it was attached from a different project.
There is a genuine functional argument for a front lip at sustained highway and track speeds. A properly designed front lip increases the effective front splitter area, reducing front-end lift and improving steering response at speed. On a track where you are carrying real speed through corners, that front-end stability improvement is meaningful. On the street, the effect is less pronounced - you would have to be going very fast for a long time to feel the aerodynamic difference clearly. I am not going to oversell the aero function. The honest position is that most of the value here is visual, with a real but secondary performance benefit at track speeds. Both of those things are legitimate reasons to buy a front lip.
Why carbon over the less expensive bumper-painted or polyurethane alternatives? Three reasons. First, the weight of a carbon piece is meaningfully lower than a painted plastic or polyurethane alternative, and at the very front of the car, that weight reduction affects front-end feel slightly. Second, carbon does not flex and distort the way soft polyurethane does - a carbon lip holds its shape and profile through temperature extremes, which matters for both aero consistency and visual quality over time. Third, the texture and finish of genuine carbon fiber next to the G87's factory painted bumper looks intentional in a way that painted plastic does not. I also want the carbon front lip to complement the Eventuri carbon intake that is already visible through the grille openings. Visual cohesion matters.
Turner G87 carbon front lip construction and OEM bumper fitment
The Turner Motorsport Carbon Front Lip for the G87 M2 is made from 2x2 twill weave carbon fiber with a gloss clear coat over-layer for UV protection. That UV protection detail matters more than it sounds - raw or improperly sealed carbon will chalk and fade in sunlight over a few seasons, and a front lip is about the most sun-exposed carbon piece on the car outside of a roof panel. Turner's clear coat application keeps the weave looking sharp for the long term. The 2x2 twill weave is the standard BMW M Performance visual language, which means it does not look like an aftermarket bolt-on next to OEM M carbon pieces. It fits into the factory aesthetic correctly.
The installation uses the OEM bumper mounting locations, so there is no drilling, no modification to the bumper, and no brackets that require fabrication. The kit includes the necessary hardware plus 3M trim adhesive for secondary retention. One install note that Turner specifically calls out: the hardware selection depends on whether your G87 has a factory skid plate or not. Turner includes different fasteners for each configuration, and sorting out which set applies to your car before you start the install saves a lot of back-tracking. If you are unsure about your car's skid plate configuration, you can use the BMW chassis lookup tool to confirm factory equipment from your VIN. The install itself is straightforward for anyone comfortable working around a front bumper - plan for one hour and have another person available to hold the lip in place while you set the 3M adhesive and start fastening.
One honest limitation: carbon front lips are vulnerable to low-speed parking lot damage and scraping. The G87's low front end already makes it a candidate for occasional scrape damage on steep driveway entries and speed bumps. A carbon lip makes that scenario worse because carbon chips rather than flexes. If your daily driving environment involves a lot of steep driveway entries or rough urban curb drops, a polyurethane lip is actually a more practical choice at the cost of some visual quality. I would make my peace with the occasional scrape risk and live with the carbon because the visual result is worth it to me. But I would not be surprised if I replaced it after a bad driveway incident.
When to add the Turner front lip to your M2 G87 aero build
The front lip goes on at position five, and honestly the only reason it does not go on earlier is that I would rather have all the mechanical work - intake, suspension, brakes, wheels - sorted before I start adding pieces that live at the most vulnerable point of the car. Once I have confirmed the ride height with the Dinan coilovers and know exactly how close the front lip will be to ground level in daily driving, I can install the lip knowing what clearance I am working with. Installing a front lip before finalizing ride height is a way to end up with a beautiful carbon piece that scrapes every parking garage speed bump at your final suspension setting.
Who might skip this? Budget-conscious builders who want to put the $800 toward a tune instead. The front lip is the first aero piece on the list and the one I would drop if something needed to come off the build to free up money for a future tune or tire budget. The car looks great without it. It looks better with it. But it is not as transformative as the intake or suspension work, and it should be treated accordingly in the financial priorities of the build.
Turner Motorsport G87 - Carbon Front Lip for M2
$799.99
Upgrade 6 - Turner Motorsport G87 Rear Diffuser - completing the back end
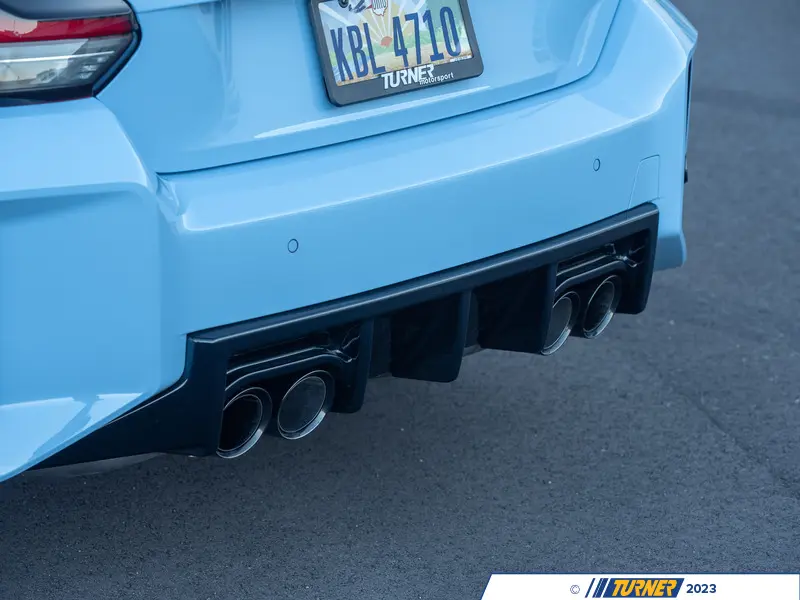
$289.00
Turner Motorsport gloss black rear diffuser installed on BMW G87 M2 replacing factory valance and showing deeper fin profile
The rear diffuser is the most affordable piece on this entire list at $289, and it punches well above its price in terms of visual impact. The G87 M2's factory rear valance is clean but slightly bland - it does the job without doing anything memorable. The Turner rear diffuser replaces it entirely with a deeper-profile unit that has a more aggressive fin layout, filling the rear bumper area with visual interest that actually complements the car's wide rear haunches. This is one of those modifications where the before and after difference is bigger than you expect from the price tag.
What I like about Turner's approach to this piece versus some of the more aggressive third-party rear diffusers available for the G87 is that it stays within the factory visual language. The G87 already has a strong rear end design - wide fenders, quad exhaust outlets, a trunk lip that does real aerodynamic work. A diffuser that tries to be more dramatic than the car's own design ends up looking like it was fitted from a different project. The Turner piece reads as something BMW might have offered as a genuine M Performance option. It sharpens the factory look rather than trying to replace it with something louder, and for a car I am going to own for years, that restraint is worth more to me than maximum visual aggression.
The material choice - gloss black UV-stabilized ABS - is the right call for a rear diffuser that lives in a position where it will encounter road debris, exhaust heat, and UV exposure on a daily basis. A carbon rear diffuser at two or three times the price would look marginally better in direct sunlight but would be more vulnerable to heat-related issues near the exhaust outlets and more expensive to replace when a rogue rock finds it on the highway. ABS is resilient, replaceable at a reasonable cost if damaged, and the gloss black finish works just as well aesthetically as carbon at the viewing angles where a rear diffuser is actually appreciated. I will save the carbon budget for pieces that are not positioned 6 inches above a rear exhaust outlet.
Turner G87 rear diffuser, the direct OEM-clip replacement valance
This is a direct replacement for the factory rear valance on the G87 M2. It uses the stock clip locations and factory hardware - there is no drilling, no bracket fabrication, and no bumper modification required. Turner built it around the G87's bumper geometry specifically, and it is designed to work with both factory and upgraded exhaust setups that use quad 4.0-inch tips. That compatibility point matters because many G87 owners will eventually upgrade the exhaust, and a diffuser that only fits the factory tip diameter becomes a problem the moment you add an aftermarket cat-back. Turner addressed that from the start.
The installation is genuinely one of the easier mods on this list. You are pulling the factory valance off its clips and pressing the Turner piece into the same clip locations. The entire job should take 30-45 minutes for anyone who has worked around bumper fascias before. Turner's install note about tab alignment is important though - the clip system on a direct-fit replacement works perfectly when every tab is seated simultaneously, but if you press one end in fully before the other side is aligned, the piece can sit slightly off even though the hardware is engaged. Work from the center outward, check that every clip is positioned before pressing anything home, and the fitment will be clean.
There is not much else to say technically about this piece. It is a well-made direct replacement at a fair price that installs cleanly and looks correct on the car. Sometimes the right part description is that simple. The BMW front splitter catalog has additional aero options if you want to compare rear diffuser alternatives, but for a clean OEM-plus build, this is the one I would buy.
Where the rear diffuser fits in the M2 G87 styling upgrade
The rear diffuser goes on at position six, right after the front lip, for the same logic that governs the front lip placement. Finish the mechanical work first, then layer the aero pieces on once the ride height is final and the mechanical setup is sorted. The front lip and rear diffuser really do belong together as a visual pair - installing one without the other leaves the build feeling slightly unfinished at either end. I would do both on the same install day, which makes the most sense from a scheduling standpoint since you are already working around both bumpers for the front lip. One labor estimate for the day, two pieces installed, and the exterior aero package is complete.
Turner Motorsport G87 - Rear Diffuser for BMW M2
$289.00

Upgrade 7 - Turner Motorsport Carbon Radiator Cover - finishing the S58 engine bay
$520.52
Turner Motorsport hand-laid pre-preg carbon fiber radiator cover installed in BMW G87 M2 S58 engine bay replacing factory slam panel
I will be honest: this is the most optional thing on this entire list. It does not make the car faster. It does not change the handling. It does not improve the braking. What it does is finish the engine bay in a way that makes it look like the car was built by people who cared about every surface, and when you have a $3,000 Eventuri carbon intake sitting in that same bay, the factory plastic radiator cover panel looks increasingly out of place. The radiator cover trim is the last piece that ties the engine bay visual package together, and at $520 for a hand-laid pre-preg carbon piece, it is reasonably priced for what it is.
The way I think about this kind of upgrade is: the engine bay of an S58-powered G87 is a visual experience in itself. When you pop the hood at a cars and coffee or after a track day, people look. The S58 is a beautiful piece of engineering and BMW's engine bay packaging is clean and well-considered. But the factory radiator slam panel is a generic-looking plastic piece that does not belong next to the level of finish the rest of the engine bay has. The Turner carbon cover replaces it with something that looks like it was designed for this bay specifically, because Turner built it from a mold of the original part. It does not look universal. It looks factory-correct in a better material.
The other reason this piece sits on my list rather than a random assortment of other cosmetic engine bay pieces is that it pairs visually with the Eventuri intake. Both are carbon fiber, both use a similar gloss finish, and both sit at the top of the engine bay where they are visible from the front of the car when the hood is raised. The visual coherence of those two carbon pieces working together is something you notice immediately once both are installed. Single carbon pieces in an otherwise stock bay can look like individual purchases with no plan behind them. Two premium carbon pieces in the same visual zone start to look like a considered build.
Turner carbon radiator cover for the G87, G80, and G82 engine bay
The Turner Motorsport Carbon Radiator Cover is a hand-laid pre-impregnated carbon fiber replacement for the factory radiator slam panel at the front of the engine bay. Pre-impregnated carbon - sometimes called pre-preg - means the carbon fiber cloth is pre-saturated with the correct resin ratio before layup, which results in more consistent resin distribution and a stronger, lighter finished part compared to wet-lay carbon. Turner cures it with an epoxy resin system and finishes the exterior with a gloss UV-resistant clear coat.
The part fits G80 M3, G82 M4, G83 M4 Convertible, and G87 M2 applications, confirming that this is a genuine cross-platform part built around the shared front structure of the G8X family. That shared fitment is not a compromise - it means this piece has been validated on more cars and more builds than a G87-only component would be, and any fitment issues would have been found and corrected long before this configuration reached the product page. Installation is a direct swap - you remove the factory plastic panel and install the Turner carbon piece in its place using the same mounting hardware. No fabrication, no modifications, no electrical interference with the cooling system.
The one thing to check on install is that all edge seals and mounting tabs are fully engaged before you close the hood for the first time. A carbon piece that is not fully seated on all its mounting points can develop a rattle or slight movement over time, and finding out about it by hearing it on a rough road is annoying. Take an extra five minutes to verify every contact point before you consider the job done.
When the carbon radiator cover earns its place in the M2 build
This goes on last, and the timing is deliberate. Installing the carbon radiator cover before the Eventuri intake is like painting a room before the furniture arrives. The intake transforms the engine bay and defines the visual direction of the space. Once the intake is in and you have driven the car for a while, you will see exactly which parts of the remaining engine bay need visual upgrading and which ones are fine as-is. The radiator cover is the piece I would be most aware of once the Eventuri is installed, which is why it comes at the end rather than the beginning of the engine bay work.
If budget forces a choice between the carbon radiator cover and the rear diffuser, I would take the rear diffuser every time. The diffuser is visible to everyone who sees the car from the outside in normal daily driving. The radiator cover is visible when the hood is open. I know which one has more impact on how the car is perceived. The radiator cover is for the people who open the hood.
Turner Motorsport Carbon Radiator Cover - Engine Bay Trim for G8X
$520.52
How much a complete BMW M2 G87 build would actually cost
I said at the start of this article that I would put real numbers on the table, so here they are without softening. The seven parts on this list add up to $9,559.46 in parts cost before labor. That is a meaningful number, and I think it is worth being clear-eyed about what that represents relative to the base price of the car. A new G87 M2 starts at roughly $67,000 and climbs quickly with options - most well-optioned examples sit closer to $75,000-80,000. Spending $9,500 in mods on a $70,000-80,000 car is roughly 12-13% of the vehicle's value, which in the BMW performance world is actually a relatively conservative build investment for the level of transformation it delivers.
The parts cost is only part of the story. Labor estimates for this full build, assuming a BMW-specialist shop like Turner is doing the work, would run approximately: intake install $200-300, coilover install plus alignment $500-700 (the alignment is the expensive part, and do not skip it), brake pad swap $150-200 (more if the big brake kit is going on simultaneously), wheel mount and balance plus hardware $100-150, front lip and rear diffuser $150-200, and radiator cover $100. That puts total labor at roughly $1,200-1,550 depending on your shop and location. Add that to the parts cost and you are looking at an all-in figure of approximately $10,750-11,100.
What this build does not include is a tune, which I consider the natural next step after all seven hardware mods are on the car. A quality ECU tune for the S58 in the G87 from a reputable BMW tuner typically runs $800-1,500 depending on whether it is a remote flash tune or a full dyno session with custom calibration. I would budget $1,200 for a good tune as the step after this build is complete. Tires for the Neuspeed RSf72 wheel set - a set of quality summer performance tires in 255/35/20 - will run $1,000-1,400 mounted and balanced. Both of those numbers are real and you should factor them into your overall build budget.
| Upgrade | Part | Price |
|---|---|---|
| 1 - Intake | Eventuri V2 Gloss Carbon Intake for S58 | $2,995.00 |
| 2 - Suspension | Dinan G87 Adjustable Coilover Suspension | $1,126.95 |
| 3 - Brakes | Pagid Racing 1204 RSL29 Brake Pads | $471.99 |
| 4 - Wheels | Neuspeed RSf72 20x9 Forged Wheel Set | $3,356.00 |
| 5 - Front Aero | Turner Motorsport G87 Carbon Front Lip | $799.99 |
| 6 - Rear Aero | Turner Motorsport G87 Rear Diffuser | $289.00 |
| 7 - Engine Bay | Turner Carbon Radiator Cover G8X | $520.52 |
| Total Parts Cost | $9,559.45 |
1 - Intake
- Part
- Eventuri V2 Gloss Carbon Intake for S58
- Price
- $2,995.00
2 - Suspension
- Part
- Dinan G87 Adjustable Coilover Suspension
- Price
- $1,126.95
3 - Brakes
- Part
- Pagid Racing 1204 RSL29 Brake Pads
- Price
- $471.99
4 - Wheels
- Part
- Neuspeed RSf72 20x9 Forged Wheel Set
- Price
- $3,356.00
5 - Front Aero
- Part
- Turner Motorsport G87 Carbon Front Lip
- Price
- $799.99
6 - Rear Aero
- Part
- Turner Motorsport G87 Rear Diffuser
- Price
- $289.00
7 - Engine Bay
- Part
- Turner Carbon Radiator Cover G8X
- Price
- $520.52
Total Parts Cost
- Part
- Price
- $9,559.45
What I would NOT buy yet for the M2 G87
A build article that only tells you what to buy is incomplete. Here is what I would hold off on, and why. The first thing on the avoid-for-now list is a full coilover system that removes the factory electronic dampers. I have seen this recommendation in a few G87 build threads and I disagree with it as a starting point. The M2's adaptive dampers are a genuine engineering asset, and the Dinan system I chose specifically works with them rather than replacing them. If you are building a dedicated track car that never needs Comfort mode, removing the electronics eventually makes sense. For a street-driven performance car that you are going to live with daily, removing the electronic damper control is giving up real functionality before you have even established whether you need to.
Second on the avoid list: downpipes or exhaust work before a tune. Aftermarket downpipes on the S58 are a meaningful power upgrade, but they change the exhaust flow characteristics enough that the factory ECU calibration is no longer appropriate for the new exhaust gas dynamics. Putting catless or high-flow downpipes on an untuned S58 means you are driving a car whose fuel and timing maps are calibrated for a different exhaust setup. You might get some power, but you are also running the engine in a condition it was not designed for. Downpipes belong on the list after the tune is scheduled, not before.
Third: large carbon hood replacements from budget suppliers. Carbon hoods for the G87 are available from multiple manufacturers at various price points, and the variance in quality is enormous. A cheaply made carbon hood with improper resin saturation, thin layups, or poor UV protection will chalk, delaminate, and warp within two or three years of exposure to the elements. At $1,500-3,000 for a quality replacement, a carbon hood is a significant investment that needs to come from a manufacturer with a real track record on BMW applications. It also requires repainting of the edge trim and mirror housings to match, adds complexity to rain seal fitment around the hood-to-fender gaps, and significantly changes the look of the car in a way that is hard to reverse. I would rather have the seven mods on this list on the car and keep the OEM hood for now.
Fourth and finally: eBay carbon fiber anything. I am not going to name specific sellers, but you know what I mean. The G87 attracts a lot of attention in the carbon aftermarket because it is a premium car where owners are willing to spend money on aesthetics. That attracts low-quality suppliers who produce carbon-look parts with thin real-carbon veneers over fiberglass or ABS substrates. These parts look great in product photos and disappointing in person, and they have the lifespan of an accessory rather than a performance part. If the carbon budget is tight, buy fewer pieces and buy good ones. One real Turner carbon piece is worth more to the build than five cheap carbon-look parts that will fade and delaminate while you still own the car.
The build order one more time, with prices
The dream G87 build I have laid out in this article is a seven-step program that starts with the upgrade you will feel every day and finishes with the detail that makes the whole package look intentional. If I owned a G87 M2 tomorrow, I would start calling Turner Motorsport about the Eventuri intake within the first week. Everything else would follow in order, paced by my schedule and budget, but the intake is the one I would never talk myself out of doing first. From there, the Dinan coilovers transform the chassis, the Pagid pads make track days viable, the Neuspeed RSf72 wheels take weight out of the rotating assembly and improve the visual package, and the Turner front lip, rear diffuser, and carbon radiator cover close out the build with the kind of finish that makes the car look like a complete project rather than a collection of individual decisions.
I want to be clear one more time about what this build is and is not. It is a street-focused performance upgrade that preserves the factory reliability and drivability of the G87. It does not void the powertrain warranty in the same way a tune or engine internals work would. It does not compromise the car's daily usability - in fact, the Dinan coilovers specifically improve daily driving feel by fixing the stock setup's compromises. And it does not require any irreversible modifications to the car. Every single item on this list can be removed and the G87 returned to factory spec if needed. That matters to me both as a resale consideration and as a warranty-navigation strategy during the early ownership period.
The total parts cost of $9,559.45 is the number I would have saved before I started ordering. I would not finance individual mods or put them on a credit card. The build order exists partly for logical reasons and partly for financial ones - buying the $2,995 intake first gives me time to save for the $3,356 wheel set later. Doing this build properly over 12-18 months rather than all at once is more financially sensible than rushing it, and each stage makes the car genuinely better so there is no period where you are sitting with a half-finished project that feels incomplete.
$2,995.00
Eventuri V2 Intake
$1,126.95
Dinan Coilovers
$471.99
Pagid RSL29 Pads
$3,356.00
Neuspeed RSf72 Wheels
$799.99
Turner Front Lip
$289.00
Turner Rear Diffuser
$520.52
Turner Radiator Cover
$9,559.45
Total Parts
FAQ - Best BMW M2 G87 upgrades
What is the best first upgrade for the BMW M2 G87
The Eventuri V2 Carbon Intake for the S58 is the best first upgrade, and it is not particularly close. It is the mod you feel on every drive from day one, it sets up the car correctly for a future tune by ensuring the intake path is sorted before the ECU calibration is done, and it transforms the engine's character in a way that reminds you why you bought an S58-powered car every single time you use the throttle seriously. If you are working with a limited budget and can only do one thing to the G87, do the intake.
Should I tune my M2 G87 before doing hardware mods
No. Tuning before supporting hardware mods is the wrong order of operations. The ECU calibration for the S58 is written around the airflow and exhaust characteristics of whatever hardware is on the car at the time of the tune. If you tune the stock intake, then install the Eventuri six months later, you either need to retune or you are running a calibration that does not reflect your actual intake setup. Do the hardware work first - intake at minimum, ideally exhaust work too if that is in your future - then tune the finished configuration once. You pay for one tune instead of two, and the result is better because the calibration was written for your actual build.
Will these upgrades void my BMW warranty
The honest answer is: hardware modifications like intakes, suspension springs, and wheels do not automatically void your BMW factory warranty. In the US, the Magnuson-Moss Warranty Act prevents manufacturers from voiding a warranty simply because aftermarket parts were installed, unless the manufacturer can demonstrate that the aftermarket part directly caused the specific failure being claimed. That said, BMW dealers are not required to make warranty claims easy, and the presence of an aftermarket intake will absolutely come up in conversation if you have a turbo-related warranty claim. My practical advice is to know what is installed on your car, understand the warranty law, and be prepared to have that conversation if needed. For anyone with a current CPO warranty they really do not want to risk, starting with the less visible mods - suspension, wheels, aero - and saving the intake for after CPO expiry is a reasonable strategy.
Can I do these mods on a leased M2 G87
Technically you can, but practically you need to be very careful. A lease requires returning the car in factory condition. Installing and then removing an Eventuri carbon intake, Dinan coilovers, carbon front lip, and forged wheels is possible but requires keeping all the factory parts in storage and reinstalling them before turn-in. The carbon body pieces are the trickiest - the factory front valance and any trim pieces you replaced need to go back on undamaged. The suspension is straightforward to reinstall, and the wheels are a simple swap. The intake requires careful reinstallation of all original components. If you lease and modify, keep every original part, keep it undamaged, and budget an afternoon of reinstall work before lease return. Some leased G87 owners do it successfully. It requires discipline about keeping the factory parts.
Will these parts fit my G80 M3 or G82 M4
Several of them will. The Eventuri V2 Carbon Intake is specifically listed for G80 M3, G82 M4, G83 M4 Convertible, and G87 M2 - it is the same S58 platform. The Neuspeed RSf72 wheels fit G80 and G82 as well. The Turner Carbon Radiator Cover fits all four G8X variants. The Dinan coilovers are G87-specific because Dinan developed the spring rates around the M2 chassis specifically, not the M3/M4 track width and weight distribution. The Turner front lip and rear diffuser are G87-specific because they are built around the G87's bumper geometry, which differs from the wider G80 and G82 bodies. The Pagid pads are StopTech caliper-specific rather than chassis-specific, so they will work on any car running StopTech ST40 or ST45 four-piston calipers regardless of BMW platform.
What is the best order to install these mods if I am doing them over 12 months
Spread across a year, the build slots in like this. Each step gives you time to drive the car and evaluate the upgrade before the next one lands.
| Month | Upgrade |
|---|---|
| Month 1-2 | Eventuri V2 Carbon Intake |
| Month 3-5 | Dinan coilovers plus four-wheel alignment |
| Month 4-6 | Pagid RSL29 pads (verify caliper setup first - stock calipers need StopTech BBK or a stock-caliper pad) |
| Month 6-8 | Neuspeed RSf72 wheels with new tires |
| Month 9-10 | Turner front lip and rear diffuser on the same install day |
| Month 11-12 | Turner carbon radiator cover, then schedule the tune for next season |
Month 1-2
- Upgrade
- Eventuri V2 Carbon Intake
Month 3-5
- Upgrade
- Dinan coilovers plus four-wheel alignment
Month 4-6
- Upgrade
- Pagid RSL29 pads (verify caliper setup first - stock calipers need StopTech BBK or a stock-caliper pad)
Month 6-8
- Upgrade
- Neuspeed RSf72 wheels with new tires
Month 9-10
- Upgrade
- Turner front lip and rear diffuser on the same install day
Month 11-12
- Upgrade
- Turner carbon radiator cover, then schedule the tune for next season
The pacing keeps spending manageable and lets each new component settle in before the next change. By the time the tune happens you will have a few thousand miles on all the new hardware, which is exactly the baseline a good tuner wants.
What if I plan to track the car regularly - does this build still make sense
Yes, with one important addition. I would prioritize the Pagid brake pads higher in the build order if track days are happening in year one. The intake and brakes would swap to positions one and two in my sequence for a track-focused owner, because arriving at a track day with stock brake pads in a 453-horsepower car is a recipe for a fade problem on the second or third session. Beyond that adjustment, the rest of the build sequence holds up fine for track use. The Dinan coilovers retain the electronic dampers, which are useful on track in Sport Plus mode. The Neuspeed RSf72 wheels are forged and strong enough for track use, though I would recommend a dedicated set of track tires on a second set of wheels rather than running your street tires on track days if you are going regularly.
Do I need a four-wheel alignment after installing the Dinan coilovers
Yes, absolutely and non-negotiably. Changing ride height changes the effective suspension geometry - camber, caster, and toe are all affected by a change in ride height because the suspension links are now operating at different angles than they were at stock height. Running the car at adjusted ride height without resetting the alignment means you are driving with incorrect toe and camber, which will wear tires unevenly, handle differently than the car should, and potentially stress suspension components asymmetrically. A proper four-wheel alignment on a Hunter or similar high-precision alignment rack after the coilover install is not optional. Budget $150-200 for the alignment as part of the suspension job. Our BMW coilovers buyer's guide covers the alignment requirements in detail if you want more context on why this matters.
What are the best M2 G87 mods under $1,000
From this build list, the Turner Rear Diffuser ($289) and Turner Carbon Front Lip ($799.99) both come in under $1,000, with the diffuser being an especially strong value for the visual impact it delivers. Outside of this specific list, brake fluid replacement for track preparation ($30-50) is the highest-value thing you can do for track confidence at almost no cost. A quality oil service with BMW-spec oil and a fresh filter is another sub-$100 investment that keeps the S58 healthy and reduces the chance of oil-related warning lights interrupting a track day. If someone put a $1,000 budget in front of me and said to do one mod from the list, I would apply it toward the intake down payment and save the rest rather than buy something smaller. The intake is too far above anything else on the list in terms of return on investment to compromise on it.
Will Turner Motorsport ship to Canada
Turner Motorsport ships internationally including to Canada. Import duties, brokerage fees, and taxes will apply depending on the value and nature of the goods, and Canadian customers should factor those costs into the total purchase price. The carbon fiber parts in this build may attract higher import assessment values due to their declared material value. For large orders - like a wheel set or a combined multi-item build order - contacting Turner directly before placing the order to understand the shipping and import cost estimate is a good move. Turner's team has handled international orders for a long time and can advise on the best shipping method for your specific order.
Can I install all of these parts myself at home
Some of them, yes. The Turner rear diffuser, Turner front lip, and Turner carbon radiator cover are all achievable DIY installs for anyone comfortable working carefully with trim clips and carbon fiber parts. The Eventuri intake is a doable DIY for someone who has worked around turbocharged BMW engines before - not a beginner job, but not complex either. The Neuspeed wheels are a straightforward swap, though you will need a shop to mount and balance tires and torque the wheels to spec. The Dinan coilovers are where I would strongly recommend professional installation, and not because the install itself is technically complex - it is a standard coilover job for any experienced suspension technician. The reason I recommend professional installation is the alignment. Unless you have access to a proper alignment rack at home, you cannot do the alignment correctly yourself after ride height adjustment. Pay a shop for the installation and alignment together, treat it as one job, and you will end up with a properly sorted car. Trying to save money on the suspension install and then paying for a bad alignment situation later is a common false economy.
Is this the definitive best upgrades for M2 G87 list or will you update it
This is my best answer right now, in 2024-2025, for a street-focused G87 owner who wants a complete and cohesive build from a single trusted supplier. The M2 G87 tuning and upgrade market is still developing - new products will arrive, pricing will change, and my own preferences might shift as I get more time studying the platform and talking to people who actually own the car. I will revisit this list when there is something genuinely better available in any of the seven categories or when pricing changes significantly. For now, this is the build I would do, in this order, with these exact parts. That is as definitive as I can honestly be.


